what is secret nailing?
Secret nailing is a method of fixing wooden floorboards to a subfloor without leaving visible nail heads on the surface of the floor. In this method, the nails are inserted into the tongue of each board at an angle, so that they are hidden from view when the next board is laid over it.
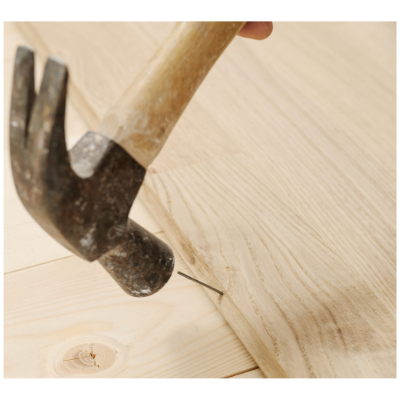
To secret nail a floor, the installer uses a flooring nailer or a pneumatic nail gun with a specific nail design, typically between 38mm to 50mm long. The nails are inserted at a 45-degree angle through the tongue of each board, ensuring that the nail head is concealed when the next board is laid over it. The nail should be positioned just above the tongue to ensure it remains hidden and does not damage the groove.
This method of fixing is particularly useful for tongue-and-groove flooring, where the boards interlock with one another, creating a strong and stable floor surface. Secret nailing provides a secure and robust fixing method while also maintaining the appearance of a smooth and uninterrupted surface.
It's worth noting that secret nailing requires a certain level of skill and experience to ensure that the nails are inserted at the correct angle and depth without damaging the wood. In addition, it may not be suitable for all types of wood flooring or subfloors, so it's important to consult with a professional flooring installer to determine if it is the best method for your specific project.
Step-by-step
Here are the general steps for secret nailing a wooden floor:
1. Preparation: First, prepare the subfloor by ensuring it is clean, level, and free of any debris or obstacles. If necessary, install a vapour barrier or underlayment to protect the floor from moisture.
2. Acclimate the wood: Before installation, acclimate the wood flooring to the room's temperature and humidity for a minimum of 48 hours.
3. Layout: Determine the layout of the floorboards, taking into account any obstacles or features such as doorways or fireplaces. Plan for the starting point, direction, and end point of the boards.
4. Begin installation: Start installing the first row of floorboards along the longest wall of the room, using spacers to maintain a consistent gap between the wall and the first board. Apply adhesive along the grooved edge of the first board.
5. Secret nailing: Using a pneumatic nail gun or flooring nailer, insert a nail at a 45-degree angle through the tongue of the board, just above the tongue edge. Continue secret nailing the rest of the first row of boards.
6. Install subsequent rows: Install the subsequent rows of boards, ensuring each board interlocks with the previous row, and use spacers to maintain a consistent gap between each board.
7. Finish installation: Continue installing the floorboards until the entire floor is covered. Use a flooring nailer to finish the final row of boards, as the tongue may not be accessible to use secret nailing.
8. Sand and finish: Once the floor is installed, sand and finish the surface to achieve the desired look and protection.
It's important to note that the specific steps may vary depending on the type of wood flooring and subfloor being used, as well as the layout and design of the room. It's always best to consult with a professional flooring installer for advice and guidance on the best installation methods for your specific project.